Personal Water Craft Forum banner

1989 wave jammer rebuild

9K views 30 replies 2 participants last post by  t.50682/  
#1 ·
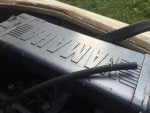
Hello everyone. Over the weekend, I managed to pick up a wave jammer that was on the side of the road marked as 'Free'. My fear was that it was missing the motor, or some major parts for it, but to my surprise when I got it home, everything was in tact. I immediately tore into it to notice that the motor was taken apart, and it appears that at one point it was seized up, and somebody had taken it apart to find that out before stopping. The good news is, they left everything with it, including all of the bolts and parts. I have managed to finish removing the motor completely, and am in the process of removing the seized pistons now. To my luck, they aren't seized too bad, and the chambers are still in great shape. The rods and crank are also in really great shape, so once I get the pistons out, I am going to take it to a buddy of mine who owns a machine shop, and get the pistons resurfaced and the chambers honed.

The question I had, was does anybody happen to have a manual, with explosive diagrams of how it goes back together? I have all of the parts and bolts, but in my haste to disassemble it, I didn't keep a good record of where the bolts go.

If somebody could get me that manual, or a place online to buy it, I would really appreciate it. I have the gasket set in my ebay shopping cart ($47) already, just waiting to make sure the pistons come out with no problems before I make any major purchases.

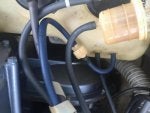
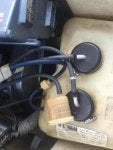
I'm not familiar with jetskis, but during disassembly I noticed that all the other parts seem to be in very good condition. The flywheel and stator look brand new, as well as the half-shaft knuckle. There is even a brand new, still in bag safety kill switch that is ready to be hooked up.
 
#24 ·
The end that say tank, goes on the tank side of that vent line. You should have two smaller nipples on the tank end, facing the engine (not the two main nipples on top). One of those is for the return line, and the other is the tank vent (should be the one . The blue line with the check valve with the label "tank" with arrow goes to that, and the arrow points to the tank. It is not a fuel supply line. If you were to hook that up with the label "tank" facing away from the fuel tank, it would allow fuel to spill out in a roll over.
Scroll down some in this post I found. Has a view of the tank and lines.

http://www.pwcforum.com/vintage-jetski/10336-1993-waveblaster-1989-wavejammer-project.html
 
#23 ·
I can't see the actual petcock to tell you. I just know that there are four houses coming from the petcock location. Two are the large hoses going directly to the fuel tank, one is a black hose with blue stripe and one is the blue hose with the check valve.

I know the ventilation hose you are referring to, it's on the right side of the hull, behind the engine. I just don't recall the blue hose with the check valve on it being anywhere near it (as I said from what I can tell the blue hose comes from the back with the rest of the hoses).

What I'm confused about with that one is the check valve says tank, with a directional arrow. I'm to understand one end stays disconnected the other end goes to one of the tanks nipples. There is only one end that's not connected from what I can see, it's it's the one that would connect to the tank (the disconnected end had the arrow pointing towards it)
 
#21 ·
The tank has a vent line to allow air in as fuel is used. It has a one way check valve on it, so fuel cannot get out, in case of a rollover.
Yes, the pulse line goes to the engine. It is a vacuum that pulses the fuel pump.
You should have a vent line going into, and out of the water separator. This prevents water from getting into the tank, via the vent, in case of a roll over. This line will have a check valve on it, and is most likely the blue line you are seeing. Find the water separator, and see if there is a line going from it to the venting system on the hull.

Yamaha WaveRunner Parts 1989 WJ500F VENTILATION Diagram
 
#20 ·
There is a check valve coming from the blue (not clear) hose that's in the bundle of hoses coming from the petcock. There is a 'tank' label on the check valve. This is connected to one nipple on the tank. There is also a black hose with blue stripe in that bundle that we have hooked into the fuel filter and then into the carb on the pump side.

What is the 'pulse hose'? Is that the larger one that plugs into the back of the engine? We have that one in place, too.

We still have one extra hose though.

I am not sure what you meant by venting off the hose should one not be hooked up?
 
#18 ·
Here's what you should have.
On and reserve from the tank to the valve.
Out from the valve to the fuel in on the fuel pump. (this is the one that has a screw in the center of the cover).
Return from the carb to the tank.
Pulse line from the engine.
Vent off the tank with a check valve.
You should have three locations on the petcock. On, res, and to carb. On and reserve pull from their own locations on the tank.
Some systems used a restrictor in the return line to limit the amount of fuel returning to the tank, so the engine would not get starved (kind of like a pressure regulator), but I'm not seeing it anywhere on yours.
If it is a clear blue line, that is most likely some after market fuel line. it probably feels very rubbery.

Yamaha WaveRunner Parts 1989 WJ500F FUEL TANK Diagram
 
#17 ·
Reserve and on are hooked up. There is a blue hose from the petcock with a check valve on it. That's hooked into the left valve on the tank. The other hose from that goes into the filter then into the left side of the carb opposite the fuel pump. There's a line left over from the fuel pump side of the carb that isn't hooked up anywhere.
 
#15 ·
It appears I'm having trouble getting the fuel lines hooked up correctly. After hooking up all lines to valves there is still one line left over. I've been trying to find a diagram but all I can find is one that shows where hoses connect to the tank, not the carb and air intake. Could somebody please help me?
 
#11 ·
Yes it is a 2 stroke engine. 2 strokes do not have oil in the crank case. All the oil they get is from the oil/fuel mixture. pwc's came from the factory with a oil injection system that is very reliable. If you are going to premix, then you need to get a block off plate, cap all the injection ports, and remove the oil tank. Mix is 50:1. If there is any sign that a seal is leaking oil, chances are very good that seal is bad, and causing a air leak, which WILL create a lean condition, and seize the engine. This is what a pressure check verifies. If this is the case, you need to replace the seals before use.
That info is in my head.
Look around ebay for a service manual.
 
#10 ·
Also, I noticed oil around the seal where the mid shaft connects in the back, so I'm assuming there are oil chambers in it somewhere, but I couldn't find an oil pan or oil filler so I'm assuming it's a 2 cycle. If that's the case do I need to fill the case with oil ahead of time since the back cover was off as well as the intake and exhaust manifolds, and the front cover and balancer, or is premixing the gas enough?
 
#8 ·
145-150 are good numbers, but they need to be within 5-10 psi of each other. I would do a pressure check. if the seals are bad, you won't make it through the season. If all checks out, then I would just reseal it in the off season. Replace the oil injection, and fuel lines, and read up on how to prime the oil injection system before starting the engine.
 
#7 ·
So...

sorry for the delay in posting. Been really busy.

It appears that the motor was in fact seized up. I took it out and tore it down, and the crank itself and the bearings in the crank are locked up. I was going to unsieze and rebuild, but I found a local eBay store that has a used one for sale. The problem he said with it, is it has a compression of 145 pounds. I am not sure what the typical compression of this engine is, but he said that it is rideable and useable in it's current state, and for only $150 bucks I think it's a steal to get it, drop it in and ride it this season, and when I garage it for the winter pull the head off and replace the gasket. I still have the parts from the other motor in the case the cylinder head is cracked or something.

What do you guys suggest?